Well I promised you something different for the March Block of the Month
and I wasn't kidding!
WORDS!
That is what we are going to do this month. You can say so much with just one or two words and even a short phrase and Australia has some of the best colloquialisms and slang in my humble and extremely biased opinion.
We have already seen some quilts with words on them - here are a few to inspire you.
.JPG)


.JPG)
.JPG)
Last week I put a call out on facebook for people's favourite Aussie expressions and here are those that were put forward
fair dinkum, howzat, little ripper, you little bewdy, stone the
crows!! On ya mate! Crikey! Good on ya, beyond the
black stump. jolly swagman, Aussie
Digger, Joe Blakes and Noah's Arks (snakes and sharks), I'll have a
crack at it, Bonza, strewth, she'll be
right mate, maaate
(maatteee, as Aussies say it), coooeeee. How ya goin? Rip
Snorta! G'day Mate, Bonza mate, That's not a
knife! Bunch a'
galahs the lot of 'em, Strike me
pink!, Onya mate, cobber; china
plate or just china (for those who don't know the last 2 mean mate) beauty mate, No dramas, Yeah ... no, no
worries, c'mon aussie,
Fair crack of
the whip, fair suck of the sav, Down under, blimey, hooroo, she's apples, flat out like
a lizard drinking, aussie,
aussie, aussie, oi, oi, oi, see ya when
the mud dries,
Be happy, Good on you
mate, Where's the
dead horse?
I do hope I haven't duplicated any and I am sure that there loads more that aren't included.
Even good old Aussie words like Vegemite, Pavlova, names of our capital cities, Australia and our animals, dingo, wombat, kookaburra, and so on would be great. Just have fun!
Even good old Aussie words like Vegemite, Pavlova, names of our capital cities, Australia and our animals, dingo, wombat, kookaburra, and so on would be great. Just have fun!
So, how do we make a bunch of Aussie words into a block of the month?
Easy!
This will be our first APPLIQUE Block of the Month.
All words are to be appliqued on to a 6 1/2 inch wide strip of homespun in any colour. Now I rarely ever specifically a particular fabric for the block of the month but as homespun is pretty cheap and you only need to buy 20cm to have enough for a 6 1/2" strip I figured it would be okay.
I have several ideas for putting these together but I will have to wait and see how many BOMs come (flooding) in. Regardless of whether you send in a few or many, having all the words on homespun or calico means that they will be easy to coodinate and should also mean that the word itself will stand out.
The letters can be appliqued in either a patterned fabric or a plain, just please make sure that there is a good contrast between the word and the background. You don't have to use Aussie fabric but this will be a very Australian month so feel free as always. Have some fun with it.
I am not going to re-invent the wheel, well re-write the tutorial, that Deborah was kind enough to write for us - you can find it here - but I am going to go over the process and give you some of my hints and tips with doing applique and also when specifically working with letters.
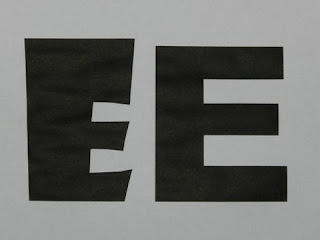
Appliqueing words is easy. First you need to have a word to trace. I print my own using my computer. I like a good thick font so that I am not working with thin little pieces of fabric that will fray and split. Check out all these different E's - they are in different fonts but the font size is the safe for all - 200. The first lot all have skinny parts or lots of curves around the ends of the letter. Skinny parts can make it hard to get a nice finish and curvy bits, particularly around the ends of a letter are quite difficult to get smooth and neat. Not recommended for a beginner.


There is an easy solution. Find an artline marker, sharpie or similar - something very dark but a child's texta will not work. It needs to be something like a permanent marker.

Carefully go over the letters. Do your best but if it is not absolutely on the line all the way around do not worry.

Now turn your sheet over. If you have used the permanent marker type pen it should have bled through to the back and yo will have your letters in reverse. This is the side that you trace from. Just take a hint from me - if you follow this method make sure you put a sheet of scrap paper under whatever you are tracing so that yo do not get marker bleeding through on to your table etc.


Tip Number 4 is to roll the excess fabrics out of the way. This makes it easier to work with the long pieces of fabric you will have but it also protects any letters that are yet to be stitched down and you are less likely to get any stray threads fraying or pulling away.


From this point you need to review the tutorial that Deborah wrote. For the sake of uniformity can you please stitch all your applique in satin stitch or as close to satin stitch as you can manage. Actually I think it is really a tight zigzag stitch.
Here are two to give you an idea of the finished product. I have yet to stitch the bottom one but you get the idea.

This is one that you can have fun with. You can applique a whole phrase, one word or a few words. Don't forget-
Strips to be 6 1/2 inches wide and whatever length you need to complete your word - feel free to include the rest of the strip if you wish.
All words to be on PLAIN HOMESPUN
Make sure there is a lot of contrast between the letters and the background.
Please use satin stitch for applique.
One final word on BOM blocks.
Please could you ensure that all fabrics used are 100% cotton and at least the same weight as patchwork fabric. Anything thinner, like some shirtings and fabrics like lawn are just too thin and will wear into holes very quickly. Anything thicker like twill will make the quilts too heavy, especially when used in blocks as all those seams make add to the weight anyway. Any questions feel free to email me.
As always, please post your BOM blocks to the following address
Aussie Hero Quilts
PO Box 248
Cherrybrook, NSW, 2126
And just before I go I have to thank my creative consultant and quality control expert, Maisy, for her constant supervision throughout the writing of this tutorial.

Till the next time..........keep spreading the word and happy stitching!
I am not going to re-invent the wheel, well re-write the tutorial, that Deborah was kind enough to write for us - you can find it here - but I am going to go over the process and give you some of my hints and tips with doing applique and also when specifically working with letters.
Appliqueing words is easy. First you need to have a word to trace. I print my own using my computer. I like a good thick font so that I am not working with thin little pieces of fabric that will fray and split. Check out all these different E's - they are in different fonts but the font size is the safe for all - 200. The first lot all have skinny parts or lots of curves around the ends of the letter. Skinny parts can make it hard to get a nice finish and curvy bits, particularly around the ends of a letter are quite difficult to get smooth and neat. Not recommended for a beginner.

Because I like to put my foot down when I applique I like straight edges, as least where possible. I find I get a better finish with fatter letters too. These two fonts are my favourites. You may have something different on your computer but these two are

On the left we have Showcard Gothic BOLD font size 200
On the right is Arial Black font size 200
and both are in BOLD which makes them thicker.
You can really use any size you want as long as you can happily applique them. Now this is Tip Number 1. Printing the letters out in bold black like this uses a lot of ink and you don't need the letters coloured in. See if your computer has a way of printing the outline only the outline of your letters. That will save you a fortune in ink. You can see the difference in the next two pictures.


This also leads into my Tip Number 2. You have to remember to trace off your letters in the reverse. If you print out your letters like I do, in outline only, they are too pale to see from the reverse and probably even too pale to see if you hold them up to a window. And I don't want to hold my letters up to a window so that I can trace them off because I prepare a lot of my applique in my office/sewing room at night time and holding them up to a window then will not help at all.
There is an easy solution. Find an artline marker, sharpie or similar - something very dark but a child's texta will not work. It needs to be something like a permanent marker.

Carefully go over the letters. Do your best but if it is not absolutely on the line all the way around do not worry.

Now turn your sheet over. If you have used the permanent marker type pen it should have bled through to the back and yo will have your letters in reverse. This is the side that you trace from. Just take a hint from me - if you follow this method make sure you put a sheet of scrap paper under whatever you are tracing so that yo do not get marker bleeding through on to your table etc.

Tip Number 3 is that you have to remember to iron your letters on to the reverse of your fabric - not as I did with one lot, the front! :-?

Tip Number 4 is to roll the excess fabrics out of the way. This makes it easier to work with the long pieces of fabric you will have but it also protects any letters that are yet to be stitched down and you are less likely to get any stray threads fraying or pulling away.


From this point you need to review the tutorial that Deborah wrote. For the sake of uniformity can you please stitch all your applique in satin stitch or as close to satin stitch as you can manage. Actually I think it is really a tight zigzag stitch.
Here are two to give you an idea of the finished product. I have yet to stitch the bottom one but you get the idea.

This is one that you can have fun with. You can applique a whole phrase, one word or a few words. Don't forget-
Strips to be 6 1/2 inches wide and whatever length you need to complete your word - feel free to include the rest of the strip if you wish.
All words to be on PLAIN HOMESPUN
Make sure there is a lot of contrast between the letters and the background.
Please use satin stitch for applique.
One final word on BOM blocks.
Please could you ensure that all fabrics used are 100% cotton and at least the same weight as patchwork fabric. Anything thinner, like some shirtings and fabrics like lawn are just too thin and will wear into holes very quickly. Anything thicker like twill will make the quilts too heavy, especially when used in blocks as all those seams make add to the weight anyway. Any questions feel free to email me.
As always, please post your BOM blocks to the following address
Aussie Hero Quilts
PO Box 248
Cherrybrook, NSW, 2126
And just before I go I have to thank my creative consultant and quality control expert, Maisy, for her constant supervision throughout the writing of this tutorial.

Till the next time..........keep spreading the word and happy stitching!
I needed practice in applique so this will be it. I liked 'this is a knife' though I won't use it, but there are lots of modern Aussie expressions, from movies and songs etc, that would be good too.
ReplyDeletelove it! I too will need a lot of practice though. I will be appliqueing onto laundry bags.
ReplyDelete