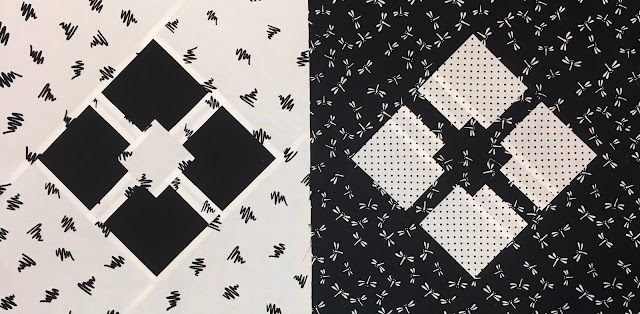
BLACK & WHITE DIAMONDS
We've made Black and White blocks in the past, and they have been SO versatile
for making quilts for our Aussie Heroes. They represent Sport teams that are requested, sometimes by adding one more colour to the quilt, and they also make a great background to
add appliqués meeting the Requests. The girls in the Coffs Harbour Sewing Team often ask "Do we have any more of the Black and White ones, they'll be just right for this quilt"
or "...for this part of my quilt".
You don't need to make equal quantities of each block.
FABRICS TO USE
- plain black and plain white fabric
- both BLACK and WHITE with prints of the opposite colour BUT the black fabric should be predominantly BLACK and the white fabric should be predominantly WHITE so that there is contrast between the fabrics to show the design elements
- Gender neutral prints
- tone-on-tone prints in either WHITE or BLACK
- combinations of the above fabrics eg. plain BLACK with printed WHITE fabric or tone-on-tone BLACK with a printed WHITE
- 100% cotton fabric
These are a few fabrics in my collection I considered using for the blocks
(the two tone-on-tone prints haven't shown their interesting prints...😞)
I like to use white thread in blocks that have white fabric so that loose threads on
the back don't shadow behind the white fabric.
Use 1/4 inch seam allowance
PLEASE NOTE
After making my blocks, I decided they should be a little larger.
USE THE MEASUREMENTS GIVEN
You will notice in my pictures, that my background squares are a little
smaller than the ones you are making.
Let's go...
CUTTING OUT THE WHITE BACKGROUND BLOCK
WHITE FABRIC
Two squares 9 1/2 x 9 1/2 inch
One square 2 3/4 x 2 3/4 inch
Two strips 1 1/4 x 2 3/4 inch
One strip 1 1/4 x 6 inch
BLACK FABRIC
Four rectangles 2 3/4 x 3 1/2 inch
Two strips 1 1/4 x 6 inch
SEWING THE WHITE BACKGROUND BLOCK
Join the strips, then press the seam allowances onto the centre strip to make it "pop"
Cut two pieces each 2 3/4 inch long
Layout the block pieces as shown
Sew the pieces together to make three rows
Sew the rows together and press the seam allowances towards the centre
Cut both large squares from point to point, creating four triangles
Fold block in half and mark the midpoint with a pin, as shown
Fold triangle in half with WRONG sides together
Lay triangle on the block with the fold line matching the pin
Open out the triangle and pin with edges together, sew the seam and press the
triangle outwards with the seam allowance under the triangle
Repeat for the opposite side of the block
Place block on the cutting mat with the edge of the block on a guideline.
Position ruler along the guideline and the edge of the block.
Trim off the little triangles.
Using the same method as before, mark the centre of the side of the block with a pin,
fold the triangle in half with wrong sides together,
match the fold to the pin, open out the triangle and pin in place. Sew and press.
Repeat for the last triangle
Notice here how my edge doesn't quite make a straight line?
No problem. Don't trim!
EVERY block will be trimmed to make it the right size for the
quilt it is going to be a part of.
REMEMBER...your block will be a little bigger than the pictured one.
Here it is! The finished WHITE background block.
CUTTING OUT THE BLACK BACKGROUND BLOCK
BLACK FABRIC
Two squares 9 1/2 x 9 1/2 inch
One square 2 3/4 x 2 3/4 inch
Two strips 1 1/4 x 2 3/4 inch
One strip 1 1/4 x 6 inch (yes, there are two in the pic!)
WHITE FABRIC
Four rectangles 2 3/4 x 3 1/2 inch
Two strips 1 1/4 x 6 inch
Use the instructions for the White background block, reversing the colour positions.
Aren't they stunning blocks!
PDF version of the block can be found HERE
Please post your blocks to
Sandy Corry
9 Wendouree Court
North Boambee Valley NSW 2450
Thank you for your contributions.
Remember to include your email address and I'll contact you when your blocks arrive.
No email? No problem! Every Wednesday, check out the BOM Happy Mail
to see the blocks that have arrived in the previous week.
Until next time,
Sandy


No comments:
Post a Comment