Hi guys it's Caroline (Deputy Nut) this month JM asked me to help her out by putting together the BOM. For the April BOM we are having a flashback to a post in June last year. Remember the Star Block Tutorial (written by the lovely JM herself) well this is a variation on that, in a larger size.
The thought behind this star is to use some novelty/feature fabric in the centre of the block. The final block measures 14 inches square and can be trimmed back quite a bit without fear of losing the points. It could be combined with some mixed strips, March BOM words, or more big stars... the possibilities are endless.
First you have to do some cutting. I have used a red bandanna fabric for the background in this example and blue for the points, and a lovely sail boat fabric for the centre. Start by cutting 1 X 5" square of your feature fabric (if you fussy cut you can get it just right). Next cut 8 X 5" squares of your background fabric (in this case the red bandanna) then finally 8 X 3" squares of the your points fabric (in this case blue).
Take your 8 point squares and using a pencil or chalk, draw a line diagonally from one corner to the other. This is your sewing line.
Place one blue (point) square in the corner of FOUR of the red (background) squares
and sew along the line
Like so !
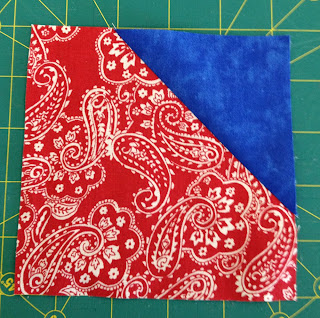
Cut away the extra fabric to a 1/4" seam
Press the blue point open so your square looks like a square again.
Next take the four remaining blue point squares and place them on an adjacent corner and sew along the line.
Again once they are sewn cut away the extra to a 1/4 " seam and press open the point so you are back to having squares again.
Now take all of your squares and arrange them into the order you are to sew them back together. So you will be sewing together a nine patch. Sew them together in rows.
Once each row is sewed together it is important to press them correctly so that the seams will nest together when you sew. The centre row press both the seams towards the centre feature square, then the top and bottom row both seams should be pressed away from the points towards the sides.
Now you will need to sew the top row on making sure you align the seams and pin so they don't move during sewing. Repeat with the final row.
You will now need to press these final seams I have pressed my seams towards the top and the bottom. Turn your pressed block over and TA DA!!
As I previously stated these blocks measure 14" square and can be trimmed to suit lots of different purposes.
So let your imaginations run wild and see what lovely creative star blocks you can produce.
If you want to go back and have a look at JM's original tutorial (she has a few more detailed piccy's) here is the link.
Thanks so much Caroline (Deputy Nut). What would I do without you! This must be my favourite block I think and I can not wait to see what you all come up with. I think this will make some awesome quilts!
Big plea here - can we please avoid all pinks and florals and anything that is purely girly. We get enough girly quilts to meet our needs and I would rather we had a few more masculine or gender neutral ones if possible please.
Till next time, keep spreading the word and happy stitching!


Great stuff as always.
ReplyDelete