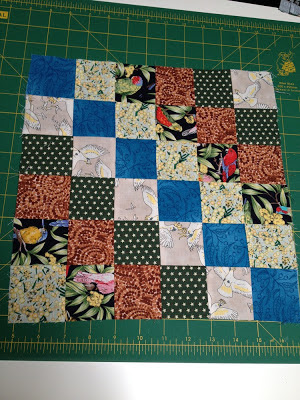
Hi all Caroline here. This month I asked Jan-Maree if I could be in charge
of the Block of the Month.
I don’t know if any of you are familiar with Instagram, it’s
a photo app that you can get on your phone and you can follow lots of
designers, quilters or just about anyone who loves to take photo’s and share
them. Well over the Christmas New Year
period I kept seeing lots of photo’s referring
to a “Scrappytripalong”. Lots and
Lots of photos of these blocks and the best part about them is they are great
for using up some of your scraps.
This is a link to the Flickr group that was started so that
people could show what they had done. (http://www.flickr.com/groups/scrappytripalong/
).
The original tutorial that everyone was following was from the
following website, (http://quiltville.blogspot.com.au/2005/06/scrappy-trips-around-world.html
) so you can have a look at where the block originated and look at the
tutorial. They show a lot more in depth
directions if you have trouble with mine - well worth a look. Here is a picture of a finished quilt from their blog.
SOURCE OF PHOTO QUILTVILLE BLOG
SOURCE OF PHOTO QUILTVILLE BLOG
You end up with finished blocks that should be 12 ½” inches
squared. If they are out a little don’t bother trimming them. Just send as is.
I have done a few blocks to show how it works with all our
Aussie fabrics. The first picture shows the blocks in the around the world placement, and the second is a chevron option, either look really good I think.
You will need scraps that are 2 ½ inches wide by 16 inches
long. And to make one block you will
need 6 different scrappy strips.
You then sew them together making sure that you start sewing
your seams at the opposite end each time to avoid distortion.
Once sewn together
you will need to press your seams. Now
this needs to be done as shown in the picture below so that when you go to sew
all the strips together the seams will nest together. See the direction of seams marked with arrows.
After you have pressed the seams, you will sew the last seam together making a
tube. Press the last seam in the same
manner as all the others. Next we need
to straighten off the end of the tube with your rotary cutter and ruler, then
cut yourself 6 x 2 ½ inch tubes.
Next is the fun part, you need to use your seam ripper to
undo some of the seams to form the block.
Starting with the top seam of the first 2 ½ inch tube, use your seam
ripper to rip every fourth or fifth stitch along the seam then open up the
seam. On the second 2 ½ inch tube rip
the seam below the seam you just did. So
for example in my picture above, if you ripped
the top seam with the cockies, then you next rip the seam between the cockies
and the green stars then rip the seam between the green stars and the brown
mosaic, and so on. You should end up
with six strips with a different square on each end.
Once lined up side by side you can see the pattern
forming. Now it is a matter of lining up
each seam and sewing them together. Because of the way that you originally
pressed the seams they should lock in together with one seam going one way and
one going the other when you butt them up to sew each seam.
I have found that the Clover fork pins are fantastic when
locking seams together they hold both seams down and are quite fine and if you
are very careful can machine over them.
But if you don’t have these 2 pins work fine ... one for each seam. Once all five seams are sewn DO NOT PRESS THE
FINAL FIVE SEAMS. The reason for this is that once everyone’s blocks come back to us some
blocks will be rotated to fit together in pleasing patterns to make up some
quilt tops. So it will be easier to press once I know how they will go together
and I can get the seams to nest together easier.
The above photo shows my completed block. It would be great if we could stick to more masculine themes
& colours, but by all means a little colour in each as this should work really
well. I think these should make up some lovely scrappy quilts and also help use up some scraps you may have lying around not knowing what to do with.
Please send all completed blocks to Jan-Maree at
Aussie Hero Quilts
PO Box 248
Cherrybrook NSW 2126
Look forward to seeing what you do with your scraps.
Cheers
Caroline
Please send all completed blocks to Jan-Maree at
Aussie Hero Quilts
PO Box 248
Cherrybrook NSW 2126
Look forward to seeing what you do with your scraps.
Cheers
Caroline


Love it! Scrappy quilts are great and are the reason that patchwork and quilting have been popular for hundreds of years. I was actually playing around with something similar this week, as I love the look of bargelo and was looking for a simpler version.
ReplyDeleteI Love it!
ReplyDeleteI will be giving it a go for sure.