Welcome back, how did you find last months' BOM? I hope you had fun making them, as this months is very similar!
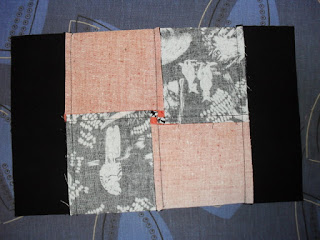
How to make a Bordered Four Patch block, just like the one pictured below.

Cutting Instructions:
4 x 3.5" (3 & 1/2") squares from four different fabrics
Border 1: Two 2 & 1/4" x 6.5" (6 & 1/2") strips
Border 2: Two 2 & 1/4" x 10" strips
Please do a test measurement on a scrap of fabric to make sure you are using a 1/4" seam allowance, otherwise your block (s) might not end up the right size.
 Take all four of the 3.5" squares, and pair them up, pin them together and then sew down one side of each pair, using a 1/4" s.a. (seam allowance).


 Press the seam toward the darker of the two squares.
 Here you can see both pairs of squares sewn together and the seams pressed towards the black & white fabrics.
Place both units right sides together, and nestle the seams as shown in the next two pics.

 Pin and sew the seam to join the two units together into a 4 patch.
 In the pic below, I've indicated with my seam ripper, the couple of stitches you're going to remove, so you can fan the seam at the back, and when pressed, it will create a mini 4 patch on the back in the centre, and produce a nice flat seam where all 4 corners are joined.....very useful for when the quilt is being quilted.

 Check measurements of your 4 patch square, it should measure 6.5".

Now take the two Border 1 pieces, and attach to either side of the 4 patch block, press the seam away from the centre square.


Check the measurement on the side you've just attached the borders to, it should measure 10" x 6.5".
Next you will be adding the final border pieces, to the remaining two sides of the block. Press the seam away from the centre square.


Voila, your Bordered 4 patch block is now complete....well, it will be, once you've checked the measurement. Your completed block should measure 10" square.
**Notes**
Please use all colours, this block is a great way to use up some of those smallerscraps offcuts that we all seem to hoard (quite rightly so, when you calculate that they cost the same amount per metre/yard as the rest of your pieces of fabric!)
Mix and match solids with patterned fabrics or all patterned, or all solid, the main thing, is to have fun making them.
Once again, please send completed blocks to:
Well I can't let Naomi have the last word so I just thought I would tell you that I was the guest speaker today at the Baulkham Hills Uniting Church and what a lovely bunch of people they were! I even had two lovely ladies make donations which was most unexpected but very muc appreciated. Several also asked if I would be happy to talk to their Probus Groups. me? Talk about Aussie Heroes? Oh alright...if I must. :-D
How to make a Bordered Four Patch block, just like the one pictured below.

Cutting Instructions:
4 x 3.5" (3 & 1/2") squares from four different fabrics
Border 1: Two 2 & 1/4" x 6.5" (6 & 1/2") strips
Border 2: Two 2 & 1/4" x 10" strips
Please do a test measurement on a scrap of fabric to make sure you are using a 1/4" seam allowance, otherwise your block (s) might not end up the right size.


Place both units right sides together, and nestle the seams as shown in the next two pics.


Now take the two Border 1 pieces, and attach to either side of the 4 patch block, press the seam away from the centre square.


Check the measurement on the side you've just attached the borders to, it should measure 10" x 6.5".
Next you will be adding the final border pieces, to the remaining two sides of the block. Press the seam away from the centre square.


Voila, your Bordered 4 patch block is now complete....well, it will be, once you've checked the measurement. Your completed block should measure 10" square.
**Notes**
Please use all colours, this block is a great way to use up some of those smaller
Mix and match solids with patterned fabrics or all patterned, or all solid, the main thing, is to have fun making them.
Once again, please send completed blocks to:
Aussie Hero Quilts
Attn: Naomi Vela
1 Obst St
Berri SA 5343
Australia
Please be sure to pop in a note with your name printed on it, so I can accredit the blocks to the right person....I'm not quite up to speed with everyone's names yet!
I will be combining last months blocks with this months, to create some great quilts for our Aussie Heroes.
I will be combining last months blocks with this months, to create some great quilts for our Aussie Heroes.
Next month it will be Kylie's turn again (sorry for hijacking your month hun) and I'm sure she'll have something as equally exciting to show you for the December BOM. I'll be back in the New Year with more BOM's and perhaps even some quilt top ideas for you (depends on what Santa brings me to play with - fabric wise!)
I know it's a bit premature, but I wish you all (Overseas, and back home) a very safe Christmas and a safe and prosperous New Year. Happy quilting.
Hugs
Naomi
Well I can't let Naomi have the last word so I just thought I would tell you that I was the guest speaker today at the Baulkham Hills Uniting Church and what a lovely bunch of people they were! I even had two lovely ladies make donations which was most unexpected but very muc appreciated. Several also asked if I would be happy to talk to their Probus Groups. me? Talk about Aussie Heroes? Oh alright...if I must. :-D
Till next time..........keep spreading the word and happy stitching!


