Aussie Heroes BOM
September 2013
Easy 4 Patch
By Naomi Vela
As always, before you start, please check your ¼” seam allowance.
Cut 2 x 9
& ½” squares of co-ordinating fabrics
I swear by Pilot frixion pens for marking my quilting
projects (see note at the bottom), but using whatever you use for marking
sewing lines on your projects, you are going to mark a line halfway along your
block from side to side. This line will be at the 4 ¾” mark, which is half of 9 ½”. (please ignore the ruler placement on the block pictured below as it was one of the test blocks I did)
Once you have marked your block, take both blocks and
align them one on top of each other as shown.
Make sure they’re aligned properly.
Directional prints are not really suited for this block.
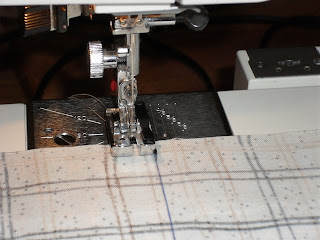
Take them to the sewing machine, and align your ¼” foot
ON the line you marked. Sew either side
of the line, a ¼” away, as shown.
When you’ve done that, your stitching should look similar
to mine in the following photo. It may
be a little hard to see, because I used thread that matched the fabric.
Now you’re going to cut each of the blocks in half along
the line you drew....ie a ¼” away from the seams you just sewed.
Once you have the two separate units, place them on your
ironing board with the darker side up, press the seams to the dark side (hee
hee).
As you’ll now have two identical units, you will turn
them right sides facing, and you can now ‘nestle’ the seams...when done
correctly, you will be able to feel all along the seam and it will feel
flat....no ridges or bumps along the stitch line.
Once again, mark the halfway line down the centre
(vertical) of the upper block, perpendicular to the seam.
As it doesn’t show up too well in the above pic, please
see the one below, where my pen points out the line I drew.
Sew ¼” either side of this line, ensuring your seams on
the underside don’t flip over. Cut on
the line again, to produce two separate units.
Now you’re going to unpick two or three stitches in the
seam allowance at the centre of the block....as shown below.
Once you’ve done this, open the block out and swirl the
centre seam so that it resembles a mini 4 patch.
(Yes I know, I know, my nails need refilling....badly!)
Press the seams so they all go around in the one
direction, either clockwise or anti clockwise depending on which of the units you’ve
just sewn
By nestling the seams the way we did, your centre seams
should all line up really well.
Now we will trim the blocks (only if you have a rotary cutter and ruler though please)
to measure 8 ½” To trim your block so it’s square, put your
ruler on the block, aligning the 4 ¼” point on the centre intersection of the
block and cut along that side, unless you are using a square, in which case you
would cut along the side and top before spinning the block to cut the other
side. If you don’t have a rotary cutter
and ruler, then please just send the block to Jan-Maree and she will get them
trimmed at her end. Please excuse the fabric change here, but all the blocks used in the tutorial pics, were made using the same method.
Once you have trimmed any fabric off the right and top sides of your ruler/square, then you will rotate the block and align the freshly trimmed edges on the 8 & 1/2" lines on your ruler/square and again trim off the excess fabric on the right and top sides.
Once you have done that, your block will be a perfect 8 & 1/2" block, with the centres all lined up.
I got 12 blocks out of 3 fq’s, and I mixed and matched
them up to make unique coloured blocks.
Send completed blocks to Jan-Maree and she has asked for
Aussie-ish colours, so think rusts, browns, greens, golds etc
Mailing address:
Aussie Hero Quilts
PO Box 248
Cherrybrook NSW 2126
NOTE: I am not sponsored by Pilot at all (pity though)
and I purchase my pens at Coles or Woolworths/Safeways. They are about $3 each and can be purchased
in several colours. The reason I use
them, is because they are heat sensitive, and the lines/marks magically
disappear when exposed to the heat of an iron.
A pdf copy of this tutorial can be obtained by clicking HERE


Looks nice and easy! I will be giving it aa go. Thanks!
ReplyDeleteHi, still here
ReplyDeleteI have just bought those pens and will be trying it out this afternoon.
ReplyDeleteHow did you go with the pens Sue? I love them, they are so handy. Also, the pdf has now been fixed (I hope) if you'd like to test it for me? Thanks hun.
DeleteHugs
Naomi