I will start this post by saying this is my first ever tutorial so please bear with me. If I leave anything out, or something is unclear, just email me or leave a comment and I will do my best to rectify.
Try to use a heavier weight fabric for the outer and calico or homespun weight for the lining. If you don't have a heavier fabric for the outer then use normal quilting fabric. The sturdier the fabric and the stitching the longer these bags will last. Also, and most important - all fabrics - particularly those pesky reds need to be pre-washed. Soldiers tend not to like wearing PINK uniforms!
For each laundry bag you need to cut two panels measuring 22" by 32" from your outer fabric and the same from your lining. You also need to cut a 4"x42" strip - this can be in the lining, in the outer fabric or from a contrast fabric. Finally, you also need about 50" of a thick cord - the cord I use is about 3/8" thick. The bag gets drawn up, the cord is looped around the top and tucked in and sent to the laundry like that - the whole bag with the contents is thrown into the big machines and then the dryers - hence the need for sturdy!
The military issue bags are white, plain blue and plain green. The most important feature of our bags is that they be DISTINCTIVE so they can be easily picked out from a pile of hundreds! Choose anything that is not white, plain blue and plain green. the fabrics don't have to be pretty - just serviceable. Bright colours, checks, strips dots, anything - just bear in mind you are making laundry bags mostly for men.
 Up until now we have been appliqueing large initials on bags but that is no longer necessary. It is nice to do it you know the recipient but I want to be able to send extra bags over to be handed to those who need them and I don't have a never ending supply of initials. Also it is too hard, now the AHQ has grown, to keep track or which of you is sewing which set of initials.
I knew the initials for Mr TT below but not for his mate but i think he mate will still be able to find hi bag and he can write his own intials on. So, make a patch similar to the one on the blue bag - make it any shape you want - just jaz it up so that it adds to the distinctive quality of the bag. raid your scrap bag for the border fabrics and use a contrasting thread for the stitching! Have some fun with it.
 Our patches are fused on and then stitched down. I use satin stitch - you can stitch however you like but stitch well so that it stands up to wear and tear. Make sure you attach your patch before you sew up your bag - so much easier!
 Take your four inch strip, turn over half an inch along one short end and then turn over again. Stitch this down with two or three rows of stitching. Repeat with the other end of the strip. Press the strip in half, lengthwise, with the right sides out. This part of the bag gets lots of wear and tear as this is the draw string channel - you might like to experiment using a sturdier fabric - a canvas etc. I am going to try some twill.
 Next sew your panels together. Take both outer pieces and sew right sides together, sewing sides and bottom. Repeat with the lining fabric except (and after making loads of these bags I still forget this step!!!) LEAVE AN OPENING IN THE BOTTOM OF THE LINING so you can turn the bag right side out at the end! Use a triple stitch if you have one or stitch two or three times. Do not snip across the corners of the bottom - this just make the bag corners weaker - these are just laundry bags. They don't need nice sharp corners but I find most of them turn out ok anyway.
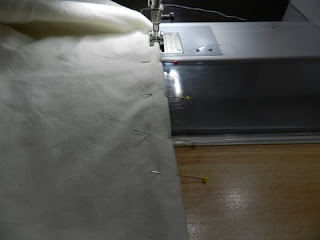
Next sandwich the outer and the lining, one inside the other, right sides together. Place one pin in each side seam just to hold them together. Take your hemmed and ironed strip, fold it in half end to end to find the half way point. Align the half way point with one side seam and slip it in between the two bag pieces, raw edges matching. Continue to slip the strip between the out and lining bag all the way around. It will not go all the way around, It isn't supposed to. Stitch all the way around the top of the bag thru all three pieces.
 Once you are done pull the bag right side out through the hole you (unlike me) remembered to leave in the bottom of the lining!


 Tuck the lining back in side the outer. Finally top stitch just under the cord channel. again with triple stitch or a couple of rows of sewing.
 Now you have your finished bag and you only need to add the cord.
 There are many more guys over there than girls so if you can make the bags either gender neutral or masculine that would be great. I would love to be able to send lots of these over there to be passed around. Once you have made your laundry bag(s) email me and i will send you my address. If I need girly bags I will let you know. If I have a group of girls to sew for specifically it is always nice to send them something a little feminine and they really appreciate it.
I plan to have fifteen quilts and fifteen laundry bags waiting for the guys that will come in and replace our friendly Warrant Officer and his team mid year. I suspect as word of the blog spreads there will be more requests too and I would like to always have some bags on hand to send over. I am hoping to cut out a batch of laundry bags to have on hand so I can sew one whenever i have a few spare moments or so I can whip one up as soon as I hear of a need!
Well, that is my most important job done for today - now on to all the other more mundane tasks!
Till next time........happy stitching!
Try to use a heavier weight fabric for the outer and calico or homespun weight for the lining. If you don't have a heavier fabric for the outer then use normal quilting fabric. The sturdier the fabric and the stitching the longer these bags will last. Also, and most important - all fabrics - particularly those pesky reds need to be pre-washed. Soldiers tend not to like wearing PINK uniforms!
For each laundry bag you need to cut two panels measuring 22" by 32" from your outer fabric and the same from your lining. You also need to cut a 4"x42" strip - this can be in the lining, in the outer fabric or from a contrast fabric. Finally, you also need about 50" of a thick cord - the cord I use is about 3/8" thick. The bag gets drawn up, the cord is looped around the top and tucked in and sent to the laundry like that - the whole bag with the contents is thrown into the big machines and then the dryers - hence the need for sturdy!
The military issue bags are white, plain blue and plain green. The most important feature of our bags is that they be DISTINCTIVE so they can be easily picked out from a pile of hundreds! Choose anything that is not white, plain blue and plain green. the fabrics don't have to be pretty - just serviceable. Bright colours, checks, strips dots, anything - just bear in mind you are making laundry bags mostly for men.

I knew the initials for Mr TT below but not for his mate but i think he mate will still be able to find hi bag and he can write his own intials on. So, make a patch similar to the one on the blue bag - make it any shape you want - just jaz it up so that it adds to the distinctive quality of the bag. raid your scrap bag for the border fabrics and use a contrasting thread for the stitching! Have some fun with it.


Next sandwich the outer and the lining, one inside the other, right sides together. Place one pin in each side seam just to hold them together. Take your hemmed and ironed strip, fold it in half end to end to find the half way point. Align the half way point with one side seam and slip it in between the two bag pieces, raw edges matching. Continue to slip the strip between the out and lining bag all the way around. It will not go all the way around, It isn't supposed to. Stitch all the way around the top of the bag thru all three pieces.


Fold the raw edges of the lining in and stitch the hole closed. Don't bother hand stitching - no one is going to see it and you need it to be strong. I like to use a triple stitch this or stitch it twice.


I plan to have fifteen quilts and fifteen laundry bags waiting for the guys that will come in and replace our friendly Warrant Officer and his team mid year. I suspect as word of the blog spreads there will be more requests too and I would like to always have some bags on hand to send over. I am hoping to cut out a batch of laundry bags to have on hand so I can sew one whenever i have a few spare moments or so I can whip one up as soon as I hear of a need!
Well, that is my most important job done for today - now on to all the other more mundane tasks!
Till next time........happy stitching!
Thanks for the instructions, I'll get onto it asap!
ReplyDeleteCheers
Anne
Hi Jan-Maree, As soon as I go back to work i'll get on to these, you are doing a great job. #1 sons Girlfriends father has just deployed so maybe I'll send him one to :)
ReplyDeleteThank you for the tutorial Jan-Maree.
ReplyDeleteThank you for the tutorial Jan-Maree.
ReplyDeleteThis is probably a dumb question, but is the opening on the 22" side or the 32" side?
ReplyDelete